Power Semiconductor Devices

More on this category »

Latest Post

PITOT TUBES

previous VENTURI TUBES
Pitot tubes are used to q easure the flow of gas, steam, water, and other liquids in ducts and pipes. A pitot tube is a device that consists of a tube having a short , right-angled bend that is placed vertically in a moving body of fluid with the mouth of the bend directed upstream (figures 5-12 through 5-16). The most common applications include heating, ventilating, and air-conditioning (HVAC) systems and low velocity drafts. Pitot tubes are widely used as permanent and spot-check meters. Their characteristics are well known and information is widely available. Pitot tubes are generally less than l/2-inch in diameter and are inserted into the flow stream at right angles to the flow. Pitot tube meters measure the velocity of flow at only one point. If properly installed, they provide accurate and reliable flow measurement. Pitot tubes are suited for low to medium flow in large ducts. Due to their small size, pitot tubes cause very little permanent pressure loss. They are excellent for monitoring purposes because they are so portable and easily inserted and withdrawn from a flow stream.
1. Operating Principle: The principle used in a pitot tube meter is that when a flowing fluid impacts an object, its velocity drops to zero and the pressure at impact increases. The pitot tube measures the difference between impact (velocity) pressure and static pressure created at impact. Flow rate is determined by comparing the two pressures and the known relationship between pressure and flow rate.
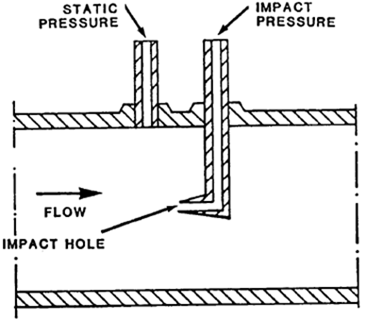
METER DESIGNS: Differences in pitot tube designs are in the positioning of static and dynamic pressure taps that are used in measuring pressures and whether the installation is to be permanent or for temporary spot monitoring. Some designs place the taps separately, with the static tap located at the duct wall and the impact tap at the end of the pitot tube (Figure 5-12). Other designs locate both taps on the tube. A single point pitot tube infers the flow from single position readings.
Averaging pitot tubes have more than one impact hole along the leading edge of the tube (Figure 5-13). The static tap is generally placed on the downstream side of the tube. The tube is screw-fitted into place. The multiple impact holes provide for an averaging of the velocity across the pipe instead of at a single point. Cylindrical-bodied averaging pitot tube meters have proven to be nonlinear (and nonrepeatable) over most of the flow range. Only designs that incorporate some sort of vortex shedding body should be used. Both permanent and portable units can be used to measure flow rates of gases, air, and steam. The pitot tube is especially useful in odd-shaped or large ducting.
RECOMMENDED APPLICATIONS: Pitot tube meters are appropriate for measuring gas and steam flow in round pipes with diameters greater than 3 inches, especially when venturi tubes and orifice plates are too expensive to utilize or cause too great a permanent pressure drop. A pitot tube is recommended where developed flow is possible by assuring minimum straight lengths of pipe upstream and downstream of the tube. Permanent mountings are particularly attractive when repeated readings will be made but other meters are too expensive.
Pitot Tube Meter
FIGURE 5-12. Pitot Tube Meter
Averaging Pitot Tube
FIGURE 5-13. Averaging Pitot Tube
Single Hole Pitot Tube With Separate Static Tap
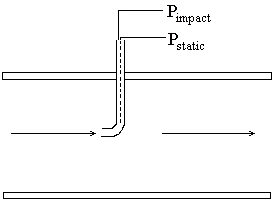
FIGURE 5-14. Single Hole Pitot Tube With Separate Static Tap
Hemispherical Head Pitot Tube
FIGURE 5-15. Hemispherical Head Pitot Tube
Commercial Pitot Tube
FIGURE 5-16. Commercial Pitot Tube
LIMITATIONS: The use of a pitot tube meter at a specific location may be limited by the following requirements:
  • Only clean fluids can be measured.
  • A recommended minimum length of straight pipe is required.
  • Meter is susceptible to errors when metering an undeveloped or disrupted flow profile.
  • Temperature is limited to 537°C (1,000°F).
  • Pressure limit is 6,000 psig.
  • Turndown is limited to approximately 3:1. (Range can be increased by stacking dp transmitters.)
INSTALLATION: Figures 5-13 through 5-16 illustrate a variety of pitot tube installations. The static pressure tap can be located either on the pipe or duct or be incorporated in the pitot tube itself. The pitot tube is inserted at right angles to the flow. The impact port must meet the flow squarely. Placement of the tube is critical. The pitot tube measures velocity at only one point. The single point is used to calculate average flow velocity, but does not necessarily represent average velocity (vcritical). In small lines, it may be impossible to place the pitot tube at ‘critical because of the pipe wall. It may be necessary to q easure flow at multiple locations to establish a relationship between the final pitot tube location and the actual flow. It is preferable to locate the pitot tube in a horizontal line. To ensure accurate flow measurement, the fluid MUST enter the pitot tube with a fully-developed velocity profile, free from swirls or vortices. Such a condition is best achieved by the use of adequate lengths of straight pipe, both preceding and following the pitot tube. The minimum recommended length of upstream piping is 7.5 times the pipe diameter. For specific lengths for a particular installation, consult manufacturer. The length is necessary to limit errors, due to piping configurations, to less than ±%0.5 percent. If minimum distances are not observed, the pitot tube meter may produce inaccurate data. In ducts that do not meet straight length requirements, it is necessary to take multiple samples to obtain an adequate flow profile.
1. Permanent Mounting With Separate Static Tap: In this option, the pitot tube impact tap is permanently mounted facing directly upstream. It is located at a point where the velocity measured represents average velocity. The static tap is drilled through the wall of the pipe less than one-half pipe diameter upstream of the impact tap. Both taps are for screw-fitted components.
MAINTENANCE: The following procedures are the minimum required for the most common types of units. When developing maintenance schedules, refer to the manufacturer’s instructions. To ensure reliable flow data, the following actions must be undertaken quarterly or when data accuracy is suspect:
  • Check for clogged orifices.
  • Check tip for wear.
  • Sensor lines should be blown down on a regular schedule.
  • Rescale dp transmitter if necessary, based on flow of previous year.
  • Test dp transmitter with dead weight pressure tester and rescale if necessary.
ACCURACY AND RELIABILITY: Accuracy is typically ±%5.0 percent of full scale. For specific applications, accuracy can be up to ±%0.75. Pitot tubes are reliable as long as the fluid being measured is sufficiently clean to avoid clogging the orifices. With contaminated or dirty fluids, Increased maintenance may be necessary to ensure accuracy.

VENTURI TUBES

previous PREFABRICATED METER ASSEMBLIES
Venturi tubes are used to measure flow in pipes and ducts. They can be applied to gases such as air and steam, and to liquids such as water and oil. Common applications include airflow in large ducts and steam output from boilers. Venturis are widely used, and a great deal of operating experience has been gained in a variety of applications. They are relatively easy to fabricate, consisting of a tube that gently converges to a low diameter throat and diverges to the downstream pipe diameter (Figure S-ll). If the cost of fluid delivery is high, venturis are desirable because they have a low, permanent pressure loss and do not decrease the delivery rate. Venturis have a low sensitivity to wear and are useful in erosive flows such as air with suspended solids. Venturi meters are especially applicable to large ducts , round or rectangular, where other types of flowmeters are expensive to fabricate and calibrate.
1. Operating Principles: Venturi tubes are inferential meters that do not measure flow directly, but cause differential pressure to occur. An inferred flow rate can be calculated by measuring change in pressure and by knowing proportional relationships. Figure 5-11 illustrates in a cutaway view, the venturi and the areas of high and low pressures associated with their respective velocities.
Venturi Tube
FIGURE 5-11. Venturi Tube
1.1 Venturi Tube/Orifice Plate Comparison: Venturi tubes can measure the same fluids as orifice plates. Like orfice plates, they can be built to match the size and shape of irregular piping. Venturi tubes cause less permanent pressure drop than orifice plates and are used more often where pumping costs are higher. Venturi tubes are less susceptible to wear from erosive fluids than orifice plate meters. However, as the size of venturi tubes increases, their cost increases more than that of orifice plates.
LIMITATIONS: The primary disadvantage of using venturi metering is their limited range. The maximum turndown ratio is limited to 4:1, which is inherent in the design. A marked change in flow conditions requires a new venturi configuration. Changing venturis is more expensive than orifice plates and requires a longer interruption of the system. Other considerations are as follows:
  • Temperature limit is 1,000°F.
  • Pressure limit is 6,000 psig.
INSTALLATION: The location of a venturi tube in the system is important. Whenever possible, it is preferable to locate the venturi tube in a horizontal line. To ensure accurate flow measurement, the fluid should enter the venturi tube with a fully developed velocity profile, free from swirls or vortices. Such a condition is best achieved by the use of adequate lengths of straight pipe, both preceding and following the primary element. The minimum recommended lengths of piping are shown in Figure 5-4. The diagram in Figure 5-4, that corresponds closest to the actual piping arrangement for the meter location, should be used to determine the required lengths of straight pipe on the inlet and outlet. These lengths are those necessary to limit errors due to piping configurations to less than +%0.5 percent. Minimum recommended distance is dependent upon the ratio of throat-to-inlet diameter. If minimum distances are not observed, the meter may produce inaccurate data.
MAINTENANCE: The following procedures are the minimum required for the most common types of units. When developing maintenance schedules, refer to the manufacturer’s instructions. Perform the following tasks at the periods prescribed.
1. Quarterly Maintenance:
(a) Flush and clean annular chamber throat and inlet.
(b) Purge trapped air from chamber and connecting pipe.
(c) Clean pressure taps.
(d) Blow down sensor lines on a regular schedule.
(e) Check pressure taps for burrs and/or debris.
(f) Resize venturi if necessary, based on flow of previous year.
(g) Test dp transmitter every 6 months with dead weight pressure tester and rescale if necessary.
2. Annual Maintenance:
(a) Clean and paint exterior of meter.
(b) Dismantle and check for corrosion.
(c) Clean and restore smoothness to internal surfaces.
(d) Check flange gasket and replace if it is leading or intruding into flow path.
ACCURACY AND RELIABILITY: Accuracy is up to ±%O.75 percent of full scale. Accuracy is diminished at lowest turndown. Venturis are more reliable than orifice plate meters because they are less susceptible to wear.
DIFFERENTIAL PRESSURE DEVICES: Dp devices are used to provide a quantitative display of the differential pressure; they are also called delta P and ΔP devices. The four most common dp devices are: manometer, diaphragm, bellows and electronic. All new or replacement installations should be electronic.
1. Manometer: The manometer is a rather simple device. One end of the manometer is attached to the high-pressure tap and the other end to the low-pressure tap of the orifice plate installation. As the dp created by the orifice plate is sensed by the manometer , a column of fluid in the manometer allows the dp to be read directly on a scale (Figure 5-7). Refer to the manufacturer’s instructions before installing a manometer.
2. Diaphragm: The diaphragm device includes a hermetically sealed diaphragm that is in an enclosure with one side open to the high-pressure tap and the other side to the low-pressure tap (Figure 5-8). The diaphragm moves as the dp created by the orifice meter is transmitted to the diaphragm chamber. A pointer attached to the diaphragm pivots about a fulcrum in the wall of the chamber and mechanically indicates the dp directly on a scale. Refer to the manufacturer’s instructions before installing a diaphragm.
3. Bellows: A bellows device is similar to the diaphragm device in that the indicator pointer is attached to a component that is subject to movement caused by the dp. In a bellows device, a partition is hermetically sealed between two bellows in a confined compartment with an opening on one side to the high-pressure tap and another to the low-pressure tap (Figure 5-9). The input ends of the bellows are fixed to the compartment walls. As the dp forces the partition to move, compressing and expanding the respective bellows, a lever system causes a pointer to directly indicate the dp on a scale. Refer to the manufacturer’s instructions before installing a bellows.
4. Electronic: Electronic devices are also known as capacitance devices. In an electronic device, the dp is transmitted through an isolating diaphragm to a hermetically sealed sensing diaphragm in the center of the device (Figure 5-10). The sensing diaphragm is surrounded by silicone oil contained between capacitors. As the sensing diaphragm deflects in proportion to the dp, the position of the diaphragm is detected by capacitor plates on each side of the diaphragm. The differential capacitance between the plates and the diaphragm is converted electronically to a 2-wire, 4-20 mA or 0-10 volt data transmission signal. Electronic devices are available in both square root and linear function models. Solid state, plug-in components simplify maintenance/repairs.
5. Calibration: Static calibration should be performed on all dp devices at least every 6 months.
6. Data Transmission: Readings from various dp devices must often be transmitted to remote data collection and recording sites. This is because the dp device may be too remote to warrant onsite reading. Data transmission may also be necessary because there may be many widely dispersed devices to be read and it would be uneconomical to have each one read onsite; or a central data management point has been set up to collect, record, plot, reduce, and analyze all flow data. All the taps for dp will accommodate remote transmission fittings along with the various dp devices.
6.1 Pneumatic: All the dp devices, except electronic, can have the readings transmitted to a remote site by pneumatic lines.
6.2 Electrical: Rather than pneumatically, the recommended means of data transmission is to have the dp electronically converted to an analog signal and transmitted electrically to a data collection center.
next PITOT TUBES